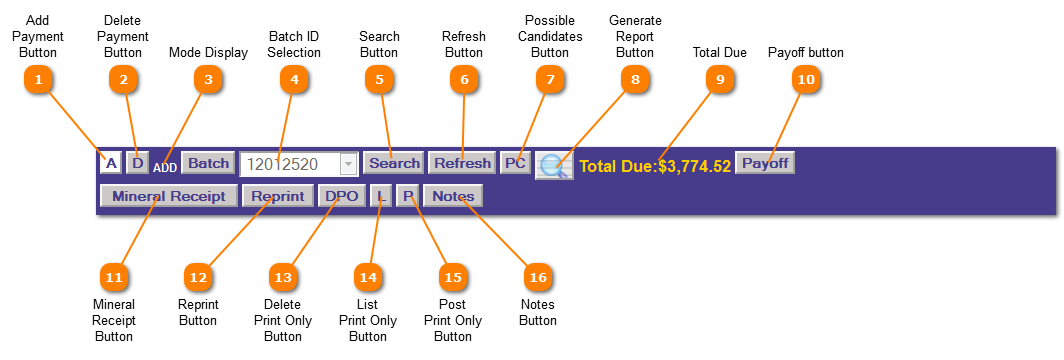
Tax Payments | Application Control Section
The Application Control Section is where all functions and features are accessed.
Information in this section will change depending on the information the account which has been called up.
For example: If taxes are due on the account the amount due (including and penalty, interest, attorney fees and other amounts) will be displayed in the upper right hand corner.
 Add Payment Button
Once a valid batch-id has been selected click the Add Button to add a new payment.
Control is then passed to the Account Owner section to select an account.
|
|
 Delete Payment Button
To delete a payment select the batch-id which includes the payment to be deleted and click the Delete Payment Button.
Control is then passed to the Owner Account section to select the record to delete.
|
|
 Mode Display
Mode display instructs the user if they are in Add or Delete mode.
|
|
 Batch ID Selection
Select a Batch ID from the drop down list or create a new batch by clicking the "Batch Button"  .
The Batch ID selected remains with the user until the current session has ended or the Batch ID is changed.
Note: A valid batch id must be selected before adding or deleting a payment.
|
|
 Search Button
Click the "Search" button to search for possible candidates based on the information selected.
|
|
 Refresh Button
Click the "Refresh" button clears the screen for entry of a new account.
|
|
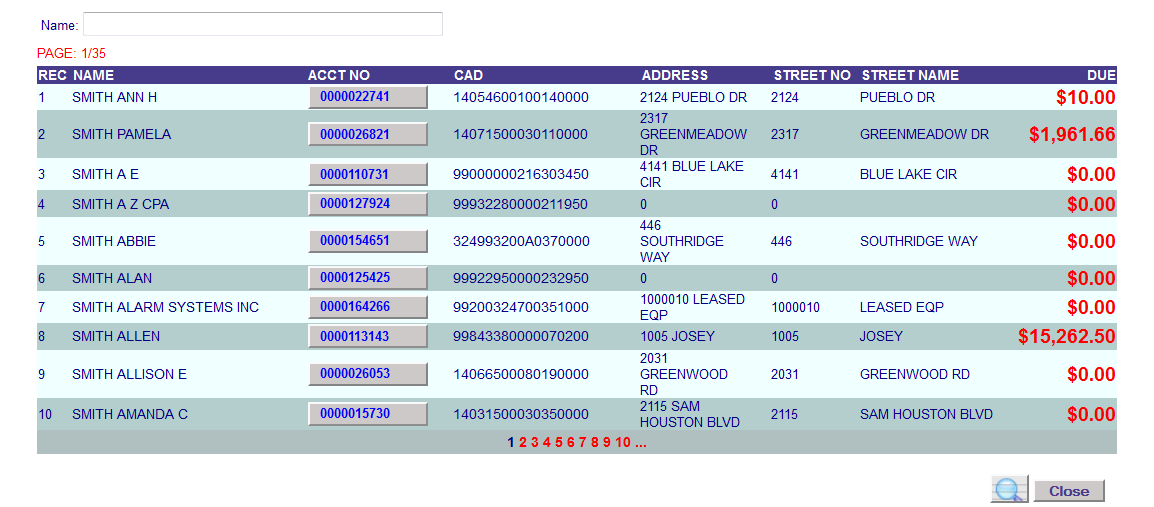
 Possible Candidates Button
Clicking the Possible Candidates button brings up the popup to display the accounts which meet the selection criteria.
|
|
 Generate Report Button
The Generate Report Button reprints the receipt for the account on the screen.
|
|
 Total Due
The Total Due display provides the total pay off amount on this account using system default parameters.
|
|
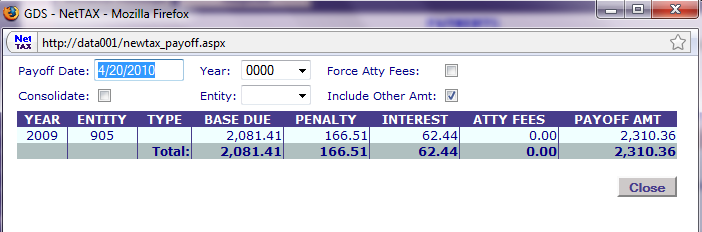
 Payoff button
Clicking the "Payoff" button displays the breakdown of the Total Due Display.
|
|
 Mineral Receipt Button
Clicking the "Mineral Receipt" prints the mineral receipt for the payment entered and still displayed.
|
|
 Reprint Button
Click the "Reprint" button to reprint a receipt for the account displayed.
|
|
 Delete Print Only Button
Click the DPO button to delete all Print Only Statements
NOTE: If you delete a Print Only record there is a receipt that has been printed and could be with a customer.
|
|
 List Print Only Button
Click the "L" Button to list all unposted Print Only Payments.
|
|
 Post Print Only Button
Click the "P" Button to Post all unposted Print Only Payments.
|
|
 Notes Button
The Notes Button will bring up a pop-up screen with page 5 of the Tax Payer Account screen so you can add any notes you deem necessary.
|
|