|
|
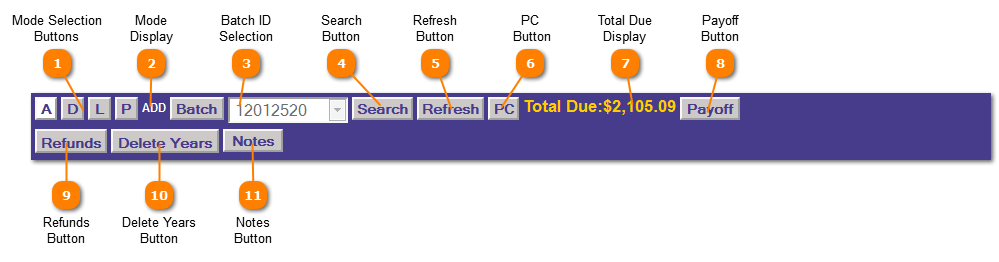
Adjustments and Refunds | Application Control Section
 Mode Selection Buttons
The Mode Selection determines which mantenace mode the program should enter.
A = Add
D = Delete
L = List
P = Post
| |
 Mode Display
Mode display instructs the user if they are in Add or Delete mode.
| |
 Batch ID Selection
Select a Batch ID from the drop down list or create a new batch by clicking the "Batch Button". The Batch ID selected remains with the user until the current session has ended or the Batch ID is changed.
A valid Batch ID must be selected before adding, deleting, listing or posting adjustments.
| |
 Search Button
Click the "Search" button to search for possible candidates based on the information selected.
| |
 Refresh Button
Clicking the "Refresh" button clears the screen for entry of a new account.
| |
 PC Button
Clicking the Possible Candidates button brings up the pop-up to display the accounts which met the selection criteria.
| |
 Total Due Display
The Total Due Display provides the total due on this account using system default parameters
| |
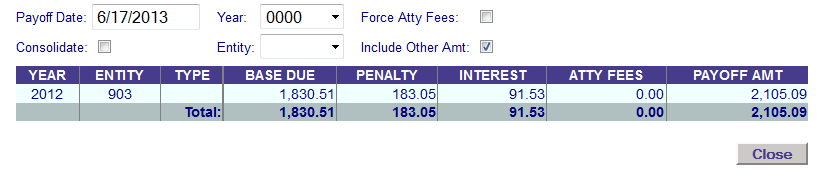
 Payoff Button
Click the "Payoff" button displays the breakdown of the Total Due Display (below).
| |
 Refunds Button
The "Refunds" button enters the application into process refunds mode.
| |
 Delete Years Button
The "Delete Years" button prompts for tax year information to remove records from the tax roll.
| |
 Notes Button
The "Notes Button" will bring up a pop-up screen with page 5 of the Tax Payer Account screen so you can add any notes you deem necessary.
| |
|
|