| < Previous page | Next page > |
How To... Current Statements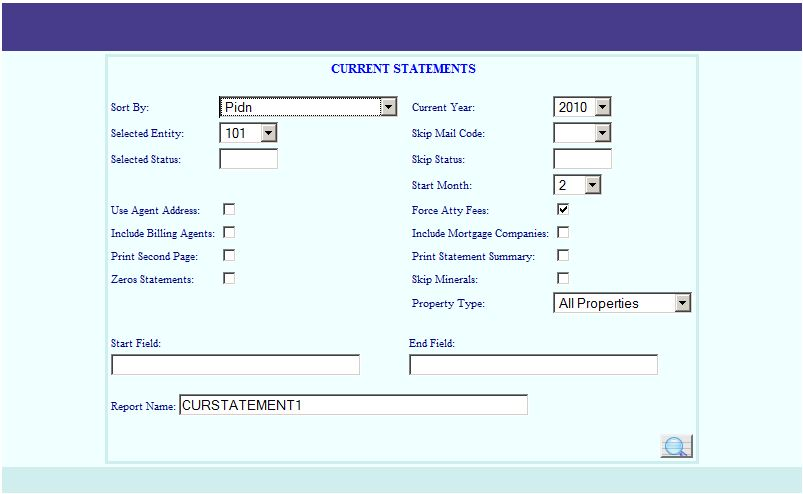
The current statements include the 5 year history, the required wording for over 65 taxpayers, payoff amounts for 5 months, etc. ...
In October when the Current statements are run for the first time each tax year, there will be 3 different runs that will be made. The first run will be for the accounts that have a mortgage code in which the statement goes to the account owner's mortgage company (also known as escrow accounts). The next run will be for the billing agents. By law, if the account has a billing agent, you are required to send a statement to the homeowner and to the billing agent . The last run will be for homeowners and businesses.
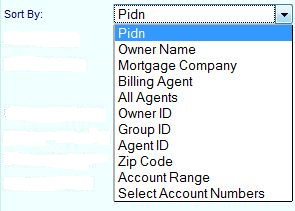
There are several options for sorting the current statements. "Billing Agent" and "All Agents" (these 2 options do the exact same thing) will print current statements for the accounts that have a billing agent and will be sorted by the agent name and then by account number. "Owner ID, "Group ID", and "Agent ID" will print current statements for accounts that have an Owner ID, Group ID, or Agent ID, respectively. "Mortgage Company" will print current statements for the accounts that have a mortgage code and will be sorted by the mortgage code and then by account number (mortgage code, account number order). "Zip Code" will print the current statements sorted first by zip code and then alphabetically by owner name.
NOTE: The zip code is in the zip+4 format so owner: "JONES BOBBY " zip code: "76117-1234"
will print before owner: "BROWN BOBBY" zip code: "76117-8924".
The "Select Account Numbers" option will allow the user to enter a list of account numbers or PIDN numbers.

The Skip Mail Code will allow the user to not print statements for accounts that have a particular Mail Status code. Leave blank if you wish to print all statements regardless of what mail code is on the account.
The selected status and skip status fields allow you to print or not print statements for accounts that have a particular account status. Up to 6 different status codes can be entered in these 2 fields. There is no need to separate the status codes with a space or a comma.
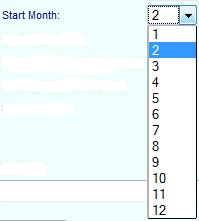
Select the month that you want the statements to start with for the 5 month penalty and interest calculation amounts.
Put a check mark in the "Use Agent Address:" check box if you wish to use the billing agent's address on the statement instead of the home owner's address. If the account does not have a billing agent, then the home owner's address will be used.
Put a check mark in the "Force Atty Fees:" check box if you wish to force attorney fees on accounts that have an "S", "J", "I", or "W" in the account status. This will add in attorney fees for the months February - June of the current year.
Put a check mark in the "Include Billing Agents:" check box if you wish to include statements for accounts that have a billing agent on file.
Put a check mark in the "Include Mortgage Companies:" check box if you wish to include statements for accounts that have a mortgage code on file.
The "Print Second Page:" check box will only apply to users who collect for more than 1 entity in which a single account has more than one entity (e.g. County, School, and City). The second page will have the account number and the 5 year history for each entity. If you have a duplex printer, then you can set it up to where the second page prints on the back of the statement by selecting "2-sided print" and "flip on long edge" in your printer setup.
NOTE: Accounts that have more than 5 entities will need to be printed separately because the 5 year history will force the statement to be on three pages instead of two making the second page start printing on the front page of the next statement.
Put a check mark in the "Print Statement Summary:" check box if you wish to print a summary page that includes the total tax, number of statements printed, total other amounts due, and the options that were selected for the statements printed.
Put a check mark in the "Zeros Statements:" check box if you wish to print statements for accounts that have no tax due which include accounts that are frozen at zero, absolute exempt accounts and accounts that are paid in full.
Put a check mark in the "Skip Minerals:" check box if you wish to not print statements for mineral accounts.
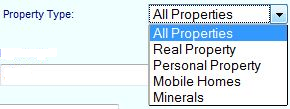
Select whether you want to print statements for "All Properties", "Real Property", "Personal Property", "Mobile Homes", or "Minerals".

The sort order chosen will determine what is put in the start field and the end field. All of the sort options with the exception of "Zip Code" are alphanumeric fields. This means that numbers will come before the letter "A" when sorted.
EXAMPLE: Lets say you want all of the accounts that have an owner name that begin with a number. You would then leave the start field blank and then enter the letter "A" in the end field. If you enter "99999999" in the end field, then the account "9TH INDUSTRIES LTD" will be missed.
EXAMPLE: Lets say you want all of the accounts that have an owner name that begin with the letter "Z". You would then enter the letter "Z" in the start field and then enter the letter "ZZZZZZ" in the end field. If you enter just the letter "Z" in the end field, then none of the Z's will get printed.
When sorting by zip code, the zip code is entered as a 9 digit number without the dash which means that you will need to enter the leading zeros.
EXAMPLE: Lets say you want all of the accounts that have the New Jersey zip code of 07458. You would then enter "074580000" in the start field and then enter "074589999" in the end field. Notice how the zip code is 9 digits long with the leading zeros.
If you have different styles of current statements setup on your system, then "Report Name:" is where you would enter the name of the current statement that you are wanting to print.
When you choose "Select Account Numbers", the "Add Statement Accounts" button will appear next to the magnifying glass at the bottom of the screen. Also, the check boxes "Include Billing Agents:", "Include Mortgage Companies:", and "Zeros Statements:" will automatically be checked.
Click on the "Add Statement Accounts" button to start entering the account numbers of the statements to be printed.
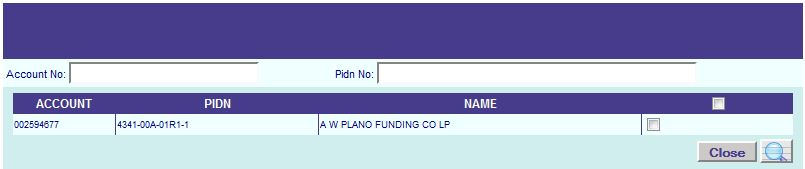
You can now enter the account number or PIDN of the statement to be printed. The statements will be printed in the order in which they are entered.

After clicking on the magnifying glass, a window will appear asking to add the note records. Click yes to add a note record on page 5 of the account record stating "CURRENT STATEMENT PRINTED".
|
| < Previous page | Next page > |